


Models
>
PEM31SF4SS
PEM31SF4SS General Electric Microwave
Jump to:
Find Part by Name
Keep searches simple, eg. "belt" or "pump".
Diagrams for PEM31SF4SS
Viewing 3 of 3


Keep searches simple, eg. "belt" or "pump".

In Stock

In Stock

The door interlock switch bracket houses and supports the door switches.
In Stock

In Stock

In Stock

In Stock

In Stock

In Stock

On Order

Special Order

In Stock

In Stock
Questions and Answers
We're sorry, but our Q&A experts are temporarily unavailable.
Please check back later if you still haven't found the answer you need.
Common Problems and Symptoms for PEM31SF4SS
Viewing 2 of 2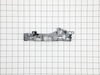
Keep searches simple. Use keywords, e.g. "leaking", "pump", "broken" or "fit".
- Customer:
- Jay from WESLEY CHAPEL, FL
- Parts Used:
- WB14X10049
- Difficulty Level:
- Really Easy
- Total Repair Time:
- 1- 2 hours
- Tools:
- Screw drivers
Door locks. Not opening.
Slide a Butter knife at left side by open push knob door will open. Then open all screws from top cover push cover top side front way then door locks Bracket have 3 microswitch pulls out switches mark them top medium and bottom. Remove 3 screws holding brackets will come out. On bottom see a Cam has 1/4” holes can holding Saft broken then
... Read more
install new door lock bracket install microswitch put 3screw and slide Cam on saft . I put a small screw on saft to hold cam on place. There was no screw . That’s why cam saft was broke. Put top cover tight all the screws and door lock fixed.
Read less
Was this instruction helpful to you?
Thank you for voting!
- Customer:
- Tom from NEWPORT, RI
- Parts Used:
- WB56X33573
- Difficulty Level:
- A Bit Difficult
- Total Repair Time:
- 30 - 60 mins
- Tools:
- Screw drivers
LED display dropping pixels
Unplug the power cord.
Place the microwave on a table
Remove the 4 plastic caps on the top of the unit.
Remove the philips screws and star screws from the back of the unit.
Remove the philip screw on the side of the unit.
Remove the back panel from the unit. The control panel is not visable.
Remove the cables ... Read more that attach to the control panel.
Remove the philip screw at the top of the control panel.
Remove the control panel from the unit.
Reverse this procedure to complete the install.
Read less
Was this instruction helpful to you?
Thank you for voting!
- Customer:
- James A from SILVERDALE, WA
- Parts Used:
- WB26X10252
- Difficulty Level:
- Really Easy
- Total Repair Time:
- 15 - 30 mins
- Tools:
- Screw drivers
the cover for the tray motor was attached to the bottom cover at 6 points. they were 3mm to 4mm long.
I used small wire cutter I use in fly tying hobby. The metal was easy to cut. When cover was removed I unplugged the motor,removed it and plugged the new one in.
To replace the cover -- reverse it,place the 2 tabs on one edge into the slots that are already part of the base. On the opposite edge there is a domed shaped tab with a h ... Read more ole in center. Place the small screw that was provided back in and thighten.
Your Done
To replace the cover -- reverse it,place the 2 tabs on one edge into the slots that are already part of the base. On the opposite edge there is a domed shaped tab with a h ... Read more ole in center. Place the small screw that was provided back in and thighten.
Your Done
Read less
Was this instruction helpful to you?
Thank you for voting!