


Models
>
DBVH510GH3WW
DBVH510GH3WW General Electric Dryer
Jump to:
Find Part by Name
Keep searches simple, eg. "belt" or "pump".
Diagrams for DBVH510GH3WW
Viewing 7 of 7


Manuals & Guides for DBVH510GH3WW
Click to downloadKeep searches simple, eg. "belt" or "pump".

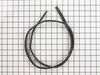
$36.44
This 89.5-inch drive belt is for dryers. It has a 4-rib design on the inside for a better grip. If comparing the size of your current belt to the new one, keep in mind that a small amount of stretchin...
In Stock

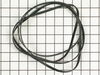
$22.35
This is a duct felt seal for a dryer. The duct felt seal allows the front-load dryer drum to glide smoothly on the front panel. Your dryer will not function properly if the drum felt seal is compromis...
In Stock

$9.21
If the lightbulb inside your dryer drum has burned out, this is an authentic OEM replacement. It is a 10W, 120V bulb that is sold individually. The bulb turns on when the dryer door is open and should...
In Stock

$65.89
This rear drum bearing kit is a genuine OEM replacement for your dryer. The kit includes a shaft, ground strap, bracket, bearing and seven screws for installation. The bearing supports that back of th...
In Stock

$67.28
The drum slides are not included with this part. The top bearing helps your dryer operate as quietly as possible. This part will require two green drum slides and 2 white drum slides.
In Stock

This single drum bearing slide is an OEM approved replacement part for dryers. It can also be known as a bearing drum slide, pad, or glide. The slides attach to the inner most slots on the front beari...
In Stock

$11.34
This Genuine OEM door latch is designed for use with a wide range of GE clothes dryers. Constructed from a combination of durable metal and plastic, the latch is mounted onto the dryer frame to secure...
In Stock

$24.20
Keep your GE dryer running smoothly with this genuine OEM rear drum bearing sleeve, designed specifically for GE dryer models. This part supports the back of the dryer drum and helps reduce friction a...
In Stock

$8.52
TThe door strike for your dryer is mounted on the dryer frame that the door shuts onto. It fits into the door catch on the door and keeps the door closed. If the door strike is damaged or missing, the...
In Stock

$8.97
This is a replacement O-ring for the drum bearing retainer on your dryer. The drum bearing is found at the back of the dryer drum. The O-ring is designed to create a seal on the drum bearing. The O-r...
In Stock

$31.08
A door switch is a simple on/off mechanism that prohibits the dryer from operating when the door is open.
In Stock

In Stock
Questions and Answers
We're sorry, but our Q&A experts are temporarily unavailable.
Please check back later if you still haven't found the answer you need.
Common Problems and Symptoms for DBVH510GH3WW
Viewing 9 of 9Noisy
Fixed by these parts


How to fix it
Marks left on clothes
Fixed by these parts
How to fix it
Door won’t close
Fixed by these parts


How to fix it
Drum Not Spinning
Fixed by these parts
How to fix it
Won’t Start
Fixed by these parts

How to fix it
Not Heating
Fixed by these parts

How to fix it
Door Pops Open
Fixed by these parts
How to fix it
Too hot
Fixed by these parts

How to fix it
Heat stays on after drum has stopped
Fixed by these parts
How to fix it


Keep searches simple. Use keywords, e.g. "leaking", "pump", "broken" or "fit".
- Customer:
- Matthew from Plainfield, IL
- Parts Used:
- WE09X27634, WE03X37317, WE03X37318
- Difficulty Level:
- Really Easy
- Total Repair Time:
- 15 - 30 mins
- Tools:
- Screw drivers
Due to over loading of the dryer the drum ruined the slides and was making a bad noise due to plastic rubbing plastic
It was pretty easy. After already taking apart the dryer to install a new belt I knew exactly my plan of action. I removed the two screws that hold the top panel of the dryer to the front panel. I then removed the top panel and removed the screws that hold the front to each side panel. I than pulled the front away from the cabinet and
... Read more
drum. I put the new slides in place and installed a new felt strip. I put it back together and that was that. Very easy.
Read less
Was this instruction helpful to you?
Thank you for voting!
- Customer:
- Bruce from Springfield, MA
- Parts Used:
- WE09X27634, WE14M124, WE03X37317, WE03X37318
- Difficulty Level:
- Really Easy
- Total Repair Time:
- 15 - 30 mins
- Tools:
- Nutdriver, Screw drivers
LOUD - screeching noise during drying cycle, in all modes of operation.
1. Removed top cap on lid by removing the 3 - phillips screws.
2. removed front digital display panel from PC board.
3. removed bolts with nut-driver on the top of the front panel, removed bottom screws with #2 square bit.
4. removed "snap-in" plastic top bearing ( paying attention to where wiring is routed within this fram ... Read more e.
5. cleaned all areas of plastic and felt debris, installed new bearing, felt, and glides.
6. Re-installed all wiring and panels.
*** make sure to order all of the glides, there should be a total of 4 for the top assembly.
Read less
Was this instruction helpful to you?
Thank you for voting!
- Customer:
- Adrian from Middletown, MD
- Parts Used:
- WE03X29897
- Difficulty Level:
- A Bit Difficult
- Total Repair Time:
- 30 - 60 mins
- Tools:
- Screw drivers
Drum belt broke
Removed the front Dryer panel. Left drum in place and lifted it up slightly to get access to motor drive. Slipped belt in place and put panel back on.
This was a first attempt ever at fixing an appliance and it was no big deal.
This was a first attempt ever at fixing an appliance and it was no big deal.
Was this instruction helpful to you?
Thank you for voting!