This part includes one grey plastic wheel with the attachment, designed for your lower dishrack. It allows you to slide the dishrack in and out smoothly. If one of these wheels is missing or damaged, ...
This is an authentic metal mounting bracket for a dishwasher, sold individually. The purpose of this part is to secure the top of the dishwasher to the bottom of your counter. If there is no way to mo...
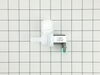
If your dishwasher isn’t filling properly or you're noticing leaks or poor cleaning, this water inlet valve could be the fix you need. It controls how much water enters the tub during each cycle, help...
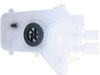
Keep your dishwasher running efficiently with this micro filter, which captures fine particles and debris from circulating water during cleaning cycles. By preventing buildup in the pump and keeping d...
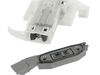
This circulation pump with heater is for dishwashers.
Circulation pump with heater moves heated water through the spray arm to clean the dishes.
Unplug the dishwasher before installing this part...
This lower rack is a practical replacement for select dishwasher models, designed to keep dishes stable and properly spaced during the wash cycle. Its durable construction ensures long-term reliabilit...
This drain pump is designed to remove water from the bottom of your dishwasher at the end of each cycle, helping ensure proper drainage and prevent standing water. Connected to the drain hose, it dire...
This genuine upper dishrack assembly fits select Bosch, Thermador, and Gaggenau dishwashers. It includes tine rows and rollers for effective dish placement and smooth operation. Ensure model compatibi...
Ask our experts a question about this part and we'll get back to you as soon as possible!
1 question answered by our experts.
< Prev
1
Next >
Sort by:
Search filter:
Clear Filter
Your search term must have 3 or more characters.
Keep searches simple. Use keywords, e.g. "leaking", "pump", "broken" or "fit".
Sorry, we couldn't find any existing answers that matched. Try using some different or simpler keywords, or submit your new question by using the "Ask a Question" button above!
David
January 25, 2025
Dishwasher overflows throw the door, I did get a new seal “the water comes out the two ends of the door”. I replaced the flow value twice. The flow switch does shut off the machine and gives E-15 code. I’ve taken out the float and cleaned up the water many times. It does rest and drains the water every time. Is there an over fill switch on this model to shut off the water so it doesn’t over fill? Or do you think I’m just unlikely and I’ve got bad replace flow valve part. I did get from two different sources.
For model number SHEM63W56N
Hi David, Thank you for reaching out. If replacing the Valve did not fix the issue, we suggest replacing the Float Switch and Housing Fix Number: FIX8737139. We hope this helps, good luck with the repair!
The bottom rack of our Bosch dishwasher was discontinued & no longer available anywhere, so we ordered an OEM replacement rack from PartSelect.com & hoped that it would fit.
The new rack fits perfectly & is actually an improvement over the old one. The new rack doesn't have a vase tower, but that is actually a big design impr
... Read moreovement because it can store more dishes & is more flexible than the old one. The new rack comes without a handle cover, but it was very easy to move the handle cover from our old rack to the new one.
The E:15 error code means water is detected in the pan under the unit. There are several ways this can happen.
In this case, it was caused by a bad inlet valve. It did not close properly and led to an overflow of water inside that eventually spilled into the pan underneath the unit.
I see now why the pump keeps run
... Read morening after this error. In this case, it would have led to a big flood in the kitchen if it did not.
I was actually able to run the unit while broke by manually operating the valve under our sink that provides water to the unit.
Be sure to turn off breaker before servicing. Don't get shocked!
Be sure to turn off water before starting! Or, you'll have a flood.
Anyway, I just pulled the unit out (was secured by 2 screws on the sides). I lifted up the insulation material on the left side to get at the valve. Pushed a little green tab to release the electrical plug. Then, use pliers to move clamp off the white water hose on the inside. Then, pull of white hose. This was hard in my case. Took a lot of force. Then, reach behind the unit and use pliers to unscrew water hose. Now, the whole gray panel there can pop out with some force. Then, slip the old valve out and slip new one in. Reconnect hoses and clamp. Note that I put some caulk on the connector where white hose goes. Not sure if needed or not.