

Like what you're reading?
Get your fix of expert articles delivered straight to your inbox!
Oops! Please double check your email address.
No Thanks - I don't like cool stuff


Take a look at any beautiful garden, and I can assure you that a lot of thought went into planning it out at the beginning. While it’s true that most gardens evolve over time (and as budget allows), there are a few considerations that need to be tended to from the get-go to avoid costly mistakes and unintended consequences.
If your lack of design know-how makes you nervous, fear not. What you might lack in skill, you can make up for with creativity and practical planning, and I’m here to show you how. With beautiful gardens, it’s a matter of “first things first.”
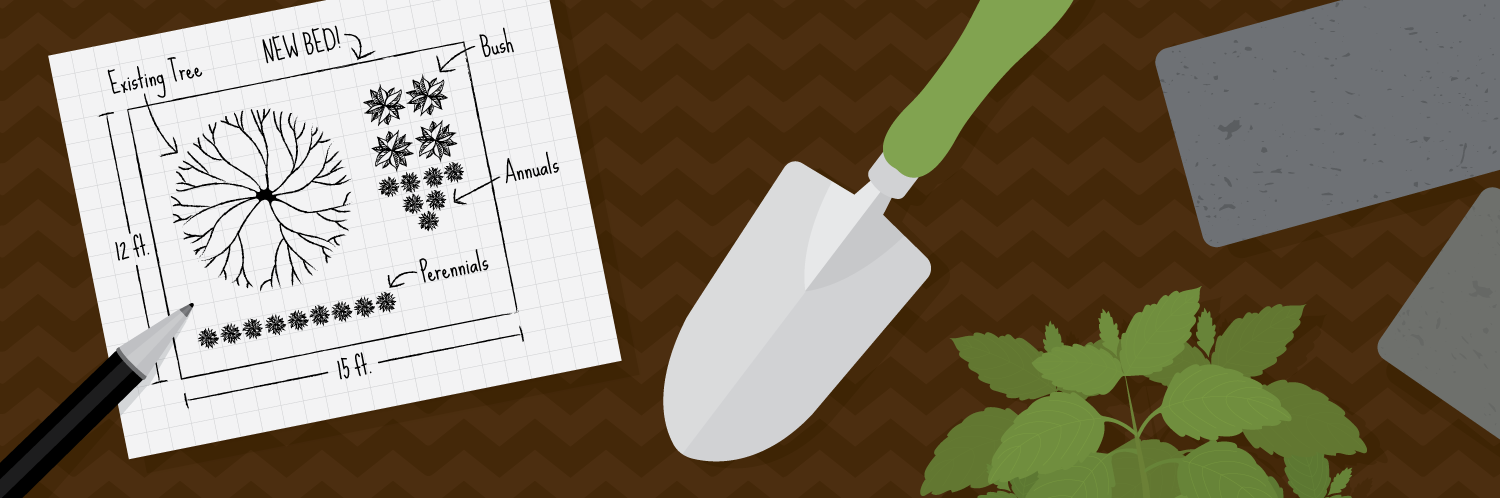
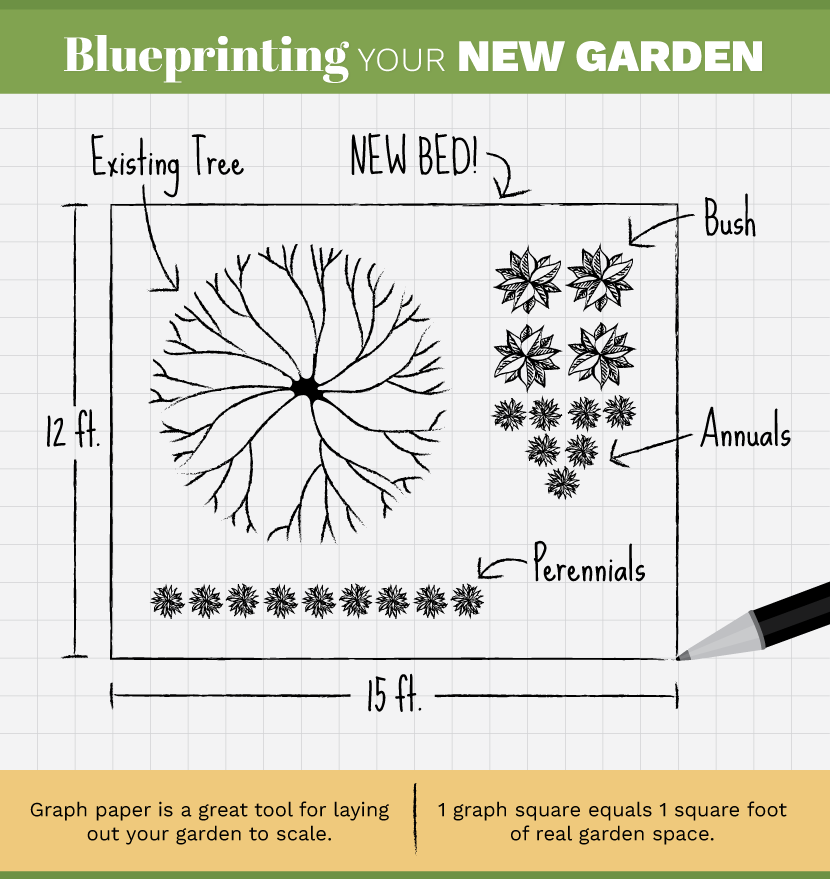
You first need to know what kind of space you are dealing with, so go out into your yard and take some measurements. If you know that you want to create a garden bed up against the fence on the right side of your back yard, then go out there and get an idea of how large a space you are considering. I like to use a flexible garden hose to outline the perimeter of the desired bed, then start taking measurements with a 25’ tape measure – how many linear feet will the edging be? What is the length and width of the bed? Are there existing trees in the proposed bed, and if so, how many feet off the fence are they?
Now go back inside and start drawing your bed out on graph paper. I like the paper with ¼” cells, and I typically plan to have each ¼” cell equal 1’ of garden bed. Draw in every feature you have measurements for, then use circles inside the bed to depict where particular plants will be placed. If you know that a desired plant will grow to about 4’ wide, your circle will be 4 squares or 1” in diameter.
This has zero to do with being trendy or using the newest plant introductions, and everything to do with knowing the growing requirements of the plants you want to use. Every plant has preferences for how much water it needs, the proper amount of sunlight and how it likes to be maintained as it grows. For example, if you love hydrangeas but live in Arizona, you might have a problem – hydrangeas love rich, acidic soil with consistent watering, and the growing conditions in Arizona just don’t fit those needs. So know what your garden space will offer (full sun, sandy soil, hot temps) and choose plants that will naturally thrive under those conditions. If you primarily use native plants – those plants that are native or “original” to your area – you will stand a much higher chance of having success with your garden.
There are different types of plants with various features, and beautiful gardens have the right mix of each. It doesn’t have to be an exact ratio, just a balance of plant types so that your garden looks great – or has interest – all year long, even during January and February. Call your area’s County Extension Office for plant suggestions for your area.
Evergreens: These plants keep their leaves and their forms all year long. They are the backbones of your garden, giving it structure from January through December. Many trees and shrubs are evergreen, but don’t forget herbs, some ornamental grasses and many tropical plants. Some plants will be evergreen in areas that have very mild winters with no freezes, while those same plants a few hundred miles north will freeze back in the winter.
Perennials: Perennials are plants that usually freeze back in the winter but return again in the spring when the weather warms up. These can be some flowering plants, ornamental grasses and some herbs. Avoid having the majority of your garden planted primarily with perennials, as that will give you nothing to look at during the cold months.
Annuals: Annuals complete their lifespan in one growing season (spring until fall, for example) and need to be replanted every year. They usually feature colorful flowers (sunflowers, zinnias, impatiens) or foliage (coleus, begonias), and are sold in 6-packs, 4” pots, gallon pots, or hanging baskets. Annuals are usually smaller “fill” plants that can be tucked in at the front of the garden for seasonal color, and changed out with the seasons.
First, know what kind of soil you have – ask at any nursery and they will likely respond with, “Oh, we’ve got clay soil in these parts,” or “We’ve got so much rock in our soil we need a stick of dynamite to dig plant holes,” etc. Your local nursery or garden center is also a great resource for what types of plants grow well in the soil you have. After identifying your soil type, be sure to remove all of the weeds and other unwanted plants (including roots!) in the new garden area. It’s a lot of work, but you don’t want weeds growing right back in before your new plants have a chance to take off. Add any soil amendments necessary to enrich your soil – again, use your County Extension office or local garden center as a resource for guidance.
Proper soil preparation is essential to the success of any garden – skimp on this step and you will regret it for years. I know it’s not the sexy and fun part of gardening, but it’s very important to get it right from the beginning. Why? Because clay soils, for example, retain water and have a difficult time letting water drain through, so if you want to plant agaves or other dry plants, they won’t be happy in the soil you have. On the other hand, if you have rocky soil, those agaves will feel right at home.
The edging is simply a way of keeping grass from growing into your garden bed. It can be mortared stone, steel, plastic, stackable concrete pavers, or a simple V-shaped trench dug around the edges of your garden. Your choice of edging largely depends upon budget, the look you are going for whether it’s formal or casual, and the style of your garden.

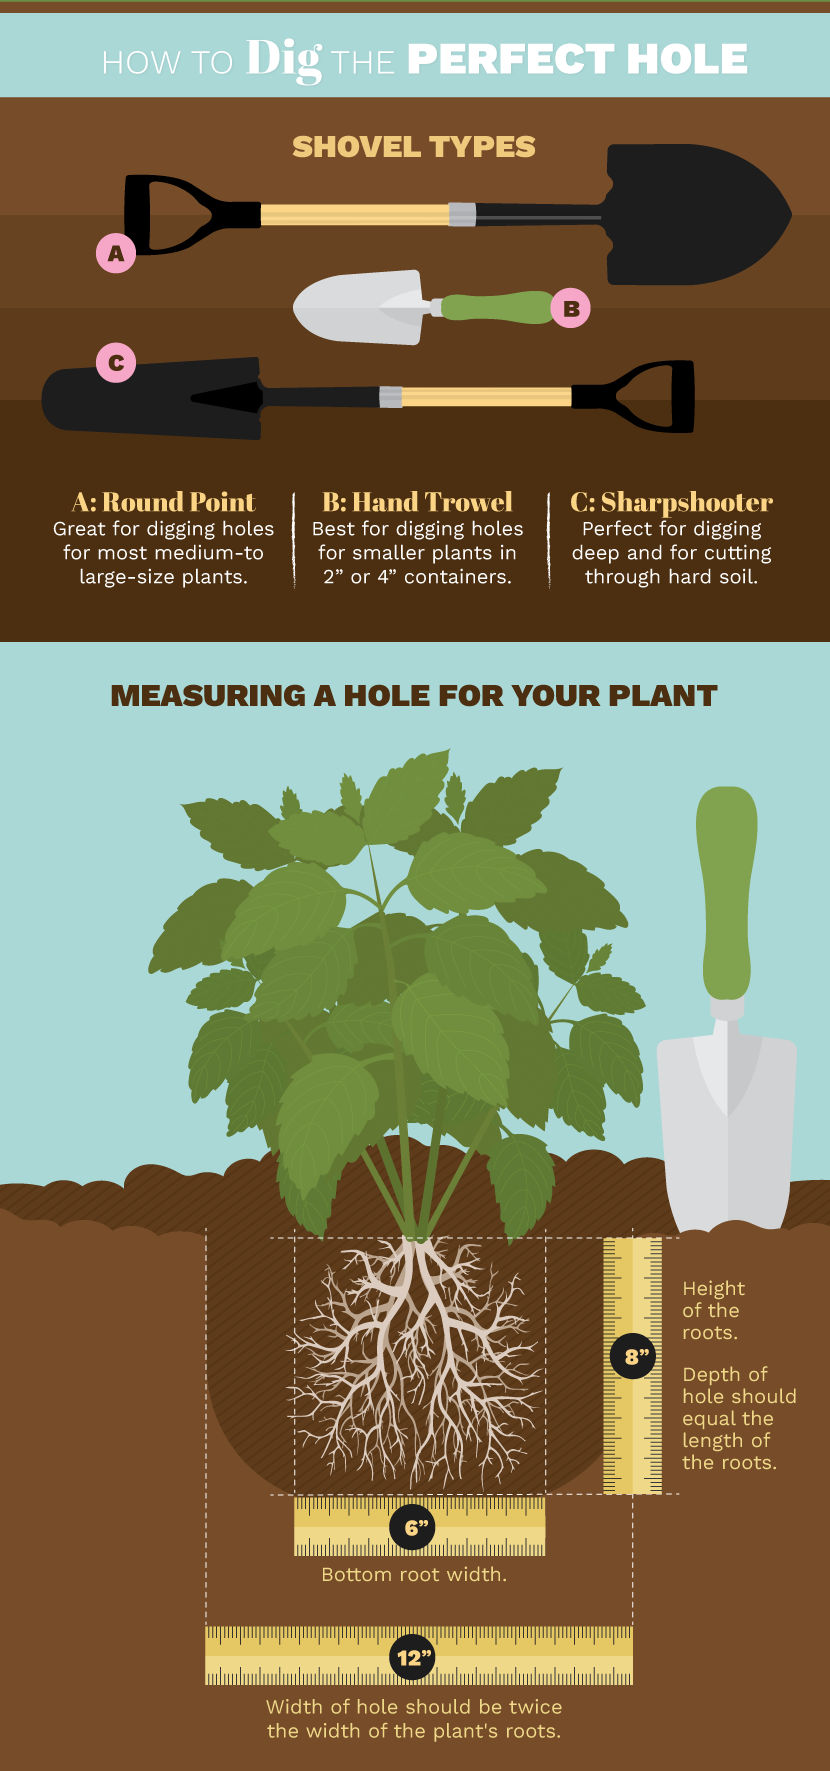
Proper planting goes a long way to ensure plant health. Dig the hole to the correct dimensions (using the correct tool for the size of the hole), remove the plant from its nursery pot, gently loosen the roots, place it in the hole, and add soil around the base. Don’t plant too high with roots exposed or too low with the stem buried.
Add a 3” layer of mulch throughout your garden, making sure to avoid heaping mulch upon the plant itself. I like shredded hardwood mulch, but your garden center can guide you to a good mulch choice for your area.
In the end, try not to worry too much about the small things, because it’s the major factors like plant placement and walkway lines that will impact the space the most. Be thoughtful, but relax, because even a little time spent on garden planning will reap huge benefits.
Embed the article on your site

Written by:
Get your fix of expert articles delivered straight to your inbox!
No Thanks - I don't like cool stuff